Showing posts with label Mr Grinder. Show all posts

Friday, 31 January 2014

oil tank fab

Had my first proper time up the barn in weeks today, I've had the 45's oil tank on my brain.

First up was the bottom of the tank. Now I didnt want a basic boring straight sided tank, so I made the top and bottom different shapes. To get the bottom to take the shape I had to do some temporary supports to pull it all together. these bits often dont get spoken about - remember its easy to just cut the tacks and smooth off...

Second up - fitting the mount for the kill switch. simple cut out and weld in place. looks really good!


With the tank looking good I then took the grinder to it and cut a huge hole in it, which i then filled up with cut down curtain rail..... WHAT? yup, either the best or worst thing I've ever done!


Looks like a pile of crap? stick with me!

once tacked in place and ground back its looking pretty good.Still loads of filling and welding, but my hair brained scheme appears to be paying off for now...


Thursday, 29 November 2012

Oil Tank

I got a new toy - A bead roller!!! had it a couple of weeks, so thought i'd spend my afternoon off making an oil bag for the 45....


The bottom line goes a bit gimpy on this side, but I think I'll be having some sort of a panel in there anyway, so my shoddy work will be suitably hidden!

too cold and dark out there now, in with a seaming mug of coffee and my slippers on......

Thursday, 27 September 2012

Good times!

Well today has been a great day. I honestly think I broke the back of it today, and feel that all the big things have now been tackled.

It was a good omen when I got outside and the morning sun was streaming down the side of the house...


Chris told me he hated the original rubber mounts for the bars, and with the big high bars, they would just make it worse, so I cracked on with turning up some new ones....


I didn't spend too much time tidying the bottoms, and need some new tips to clean the top surface, but they'll work nicely!


Just awaiting new nuts to arrive for the bottoms now...


next up - rear mudguard.

Ive been avoiding doing this - no idea why - probably cos I havent done it before, but it was time to get it done!

Got one of the laser cut tabs in the vice, and cracked the oxy acetylene-kit out for some fun!


heres a before and after kinda shot....


Man - I Love my Oxy-Acetylene kit!

pushed the wheel right up against the back of the sliders, and put the parts in place.


cleaned the paint off, and welded it in place.


I now know its not quite straight as the bike was leaned to the side slightly - but I'm not gonna loose any sleep over it!

Then used top mounts to sort the top of it out. I would be lying that it didn't take me ages to sort this out. I guess it would be much easier to do with 2 of you there, rather than trying to stuff things behind the tyre and hold the sissy bar forward, and TIG weld...


Happy boy!

I had to move the P-Pad further up the muddy, as it was closer to the seat than I was comfortable with.

With the oxy Acetylene torch still out I bent the Z into the rear brake arm...


Well that was all I was planning for the day - but as this was just past midday, thought I had better crack on some more. The final job I had been avoiding was the foot controls. A real pain as it was all getting a bit tight with the exhaust / engine and the kick pedal.

I took a few pics and consulted with the great guru Toddy (this was the second call of the day to him, as i bugged him about the muddy mounts)..


we dicussed a few options, but agreed that using a strong piece of angle iron I could weld some nuts to the back, and then weld onto the frame, while drilling the nuts into the frame rails. This was the best option as it needed to be right over the join for the hardtail - this way there was more strength being put into the frame.


I didnt take too many pics, but here it is all tacked on. When its all together and I strip the frame i'll seam weld around the box section, and probably trim the bottom somewhat...


the moment of truth - will the pipes fit on???


yup, its a snug fit, but fit a treat!

With the dome headed nuts sitting another 4-5mm proud of the bracket it has swung the back out slightly - but nothing to be really worried about....


So that concludes today's efforts class. I've even managed to get in, showered and sort dinner (with a glass of red) by 5pm!

what a great day!

Thursday, 5 July 2012

Pipe Dreams!

Amazing what you can do in a couple of hours....

Knocked off work early, and got stuck into the pipes. Had exactly what I wanted in my head, so it was just a case of attempting to execute a plan!

So I cut my tailpipes of the headers to start, then extended the back with the spare stainless I had from the scrambler


Et voila- low and long pipes!!!


Haha- as you guessed, nothing is ever that easy with me!

YEH!!!!!!!!!!! Big ass upsweeps or whatever the hell you call them... Rain catchers!!!


Knicked the pipes that arrived the other day for Chris ( don't worry mate, replacements are already ordered) and they were just what I wanted!

Now I would imagine the best way to do this is to tack it up on the bike.... Hmm.. My bike is about 50 yards from the welder, with about 10 foot vertical difference... Shit!

Mocked the bits up that I could and worked out the angles. You can see the bit of the U bend that I cut up on the floor...


My saving grace- I got a pair of baffles for them the other day, I like a loud bike, but not too loud, so I wanted to put these in the pipes. As it happens they were perfect as they were a really tight fit, and allowed me to put them into the main header, and control the angle of twist...


I also used a bit of angle iron to try and keep it all straight when welding..


On the bike...


OH HELL YEH!!!!!!!!!

Did the same on the other side


I think my sissy bar is slightly lop sided, and the pipes aren't the same length yet, so I'll have to sort that out, but it looks just how I wanted.

Finally I made a quick no frills headlight mount!


I love my project once more!!!

Thursday, 7 June 2012

Skinny bobs

So I've had a bit of time out - shit to do round the house, work to catch up on etc....

Anyways - popped over to see Toddy yesterday to discuss the frame for the 45. Its full steam ahead with it now, and he's gonna be getting on with it in my absence.


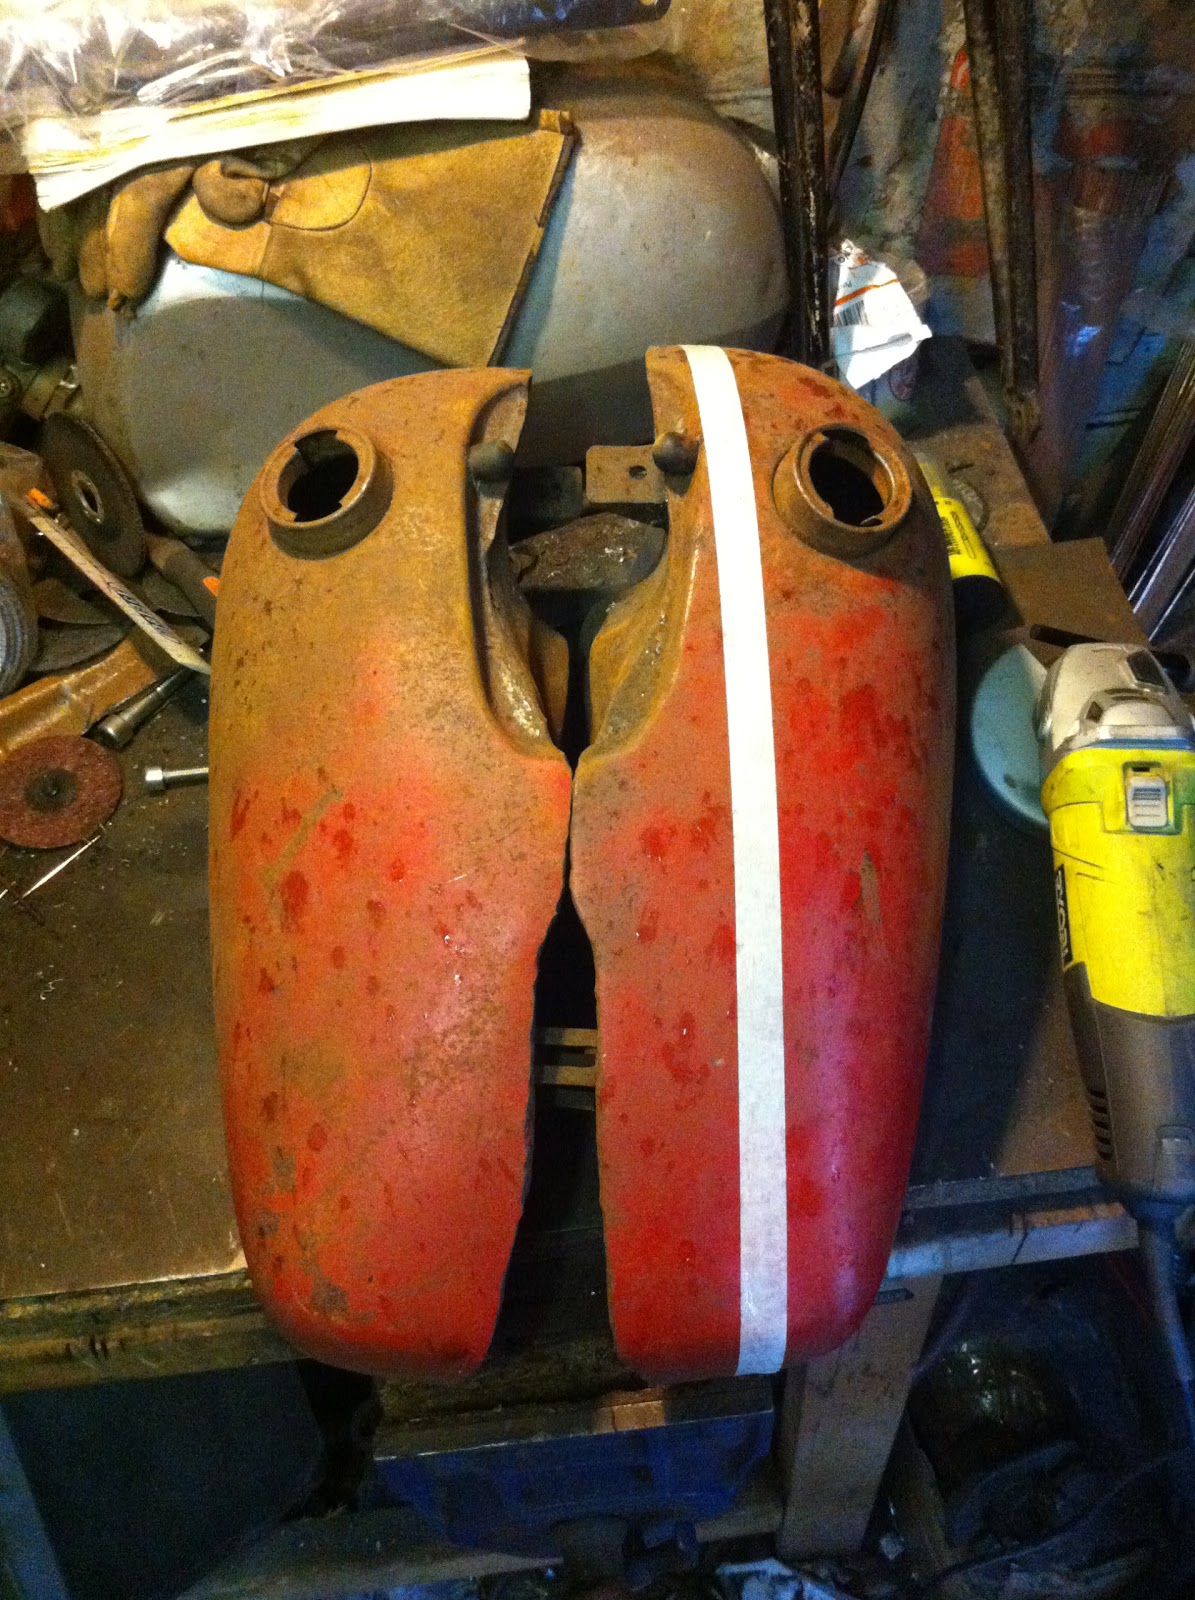
I scored an old set of fatbob tanks a while back - came with a lot of parts, that i sold on and made a tidy profit on. Anyways - these were part of the deal, plenty of surface rust, but I thought they may just work for the bike. I've seen loads of cool bikes in Greasy Kulture, and Dice, plus all the blogs with skinny 2 part tanks, so I just had to have a blast at that!.

Took them with me to Toddy's, and he agreed that with a suitable amount of cutting they would work a treat.

Toddy marked up with masking tape on the first one where he thought - couldn't agree more, so when I got them out the car about an hour ago I couldn't just leave them like that.....

Got some tape and marked the second tank. This was my first lay of the tape and I stuck with it rather then fannying about with it...


Cut the first one, and you can see how much has gone from it...


Then cut the second one....


Its amazing the difference between the shapes of the 2 tanks on the bottom. luckily they will be blanked off and stay as 2 halves. The plan is that they will run either side of the frame, so will appear slightly wider. Toddy suggested running a bit of metal down the top of the tank, so I can have the illusion that they are on top of the frame rails.

I'll get cracking on cleaning them up another day, but i'm really happy with having them sussed out.